
In a previous post, Ye Olde Tyme Apple Hacking, I outlined hardware modifications I recently made to a Macintosh LC. Naturally, this brought me in mind of a “hack” I wrote up years ago in Apple Hacking for Fun and Profit that outlined how I connected an Apple //c to a Mac Mini to use the //c as a serial terminal.
Since a serial connection and terminal software was also standard fare for classic Macs, I decided to revisit my pervious setup with my Mac LC and a modern-day (2017) iMac.
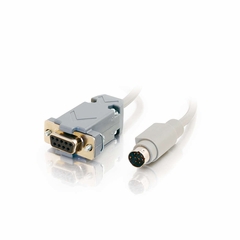
With regards to hardware, the cabling remains mostly unchanged, a USB to Serial adaptor, a null modem and a serial cable. The only notable difference is that the LC’s two serial ports (labeled Printer and Modem) are mini-DIN connectors whereas the //c used the larger format DIN connector.


For terminal emulation on the Mac LC, I went with ZTerm. ZTerm was a shareware terminal emulator for the Mac originally introduced for System 7.
On the iMac, I’m running macOS 10.15 (Catalina) which will only run 64bit applications. I note this because I’m reusing my Keyspan USB to Serial adaptor from 2007 and the software installer for the drivers of the chipset in my adaptor haven’t been updated to run in a 64bit-only computing environment. I was able to solve this apparent impasse by downloading and running Serial 2. Serial was able to recognize and install the proper drivers on the iMac without issue.
In fact, I would recommend purchasing Serial for a couple of reasons, beyond getting out of this pinch. First, with Serial running on the iMac and ZTerm on the LC, it’s a simple matter of typing in a few keys to confirm the serial connection is in working order. Secondly, which I’ll go into detail in the second part of this post, Serial pairs well with ZTerm in supporting older file transmission protocols such as Kermit and ZModem, thus enabling the transfer of files between the two systems.
The one thing that always bugged me about my old hack was the use of gnu screen to initialize the terminal session. The proper setup should be that the host system listens on the established line for an inbound connection and then initializes the login process when the connection has been established. This is what getty is for. What I didn’t consider back then was, how will getty be managed? For macOS, the answer is launchd.
With that in mind, here are the configuration settings for getty and launchd on the iMac:
Modify the file /etc/gettytab to define a terminal type. For example, append :tt=vt100 to the following line in gettytab:
2|std.9600|9600-baud::np:sp#9600So now you have something like this:
2|std.9600|9600-baud:\
    :np:sp#9600:tt=vt100:
This will tell getty that a incoming connection labeled std.9600 should established at 9600 baud connection and use the vt100 terminal settings.
For launchd create a property list (p-list) file in /Library/LaunchDaemons with the following:
<?xml version="1.0" encoding="UTF-8"?>
<!DOCTYPE plist PUBLIC "-//Apple//DTD PLIST 1.0//EN"
"http://www.apple.com/DTDs/PropertyList-1.0.dtd">
<plist version="1.0">
<dict>
    <key>RunAtLoad</key>
    <true/>
    <key>KeepAlive</key>
    <true/>
    <key>Label</key>
    <string>serialconsolelc</string>
    <key>ProgramArguments</key>
    <array>
        <string>/usr/libexec/getty</string>
        <string>std.9600</string>
        <string>tty.USA19H22P1.1</string>
    </array>
</dict>
</plist>
A few bits about the contents of this file:
Ah, but which device? As I noted over a decade ago:
$ cd /dev
$ ls tty.*
Among other tty devices on your system, you should see something akin to, tty.USA19H22P1.1 That’s what you want to include as the final ProgramArguments.
Alternatively, in Serial, File -> Open Port will also provide a list of available serial devices that can be used.
Now load this setting into launchd and initiate:
$ sudo launchctl load -F /Library/LaunchDaemons/serialconsolelc.plist
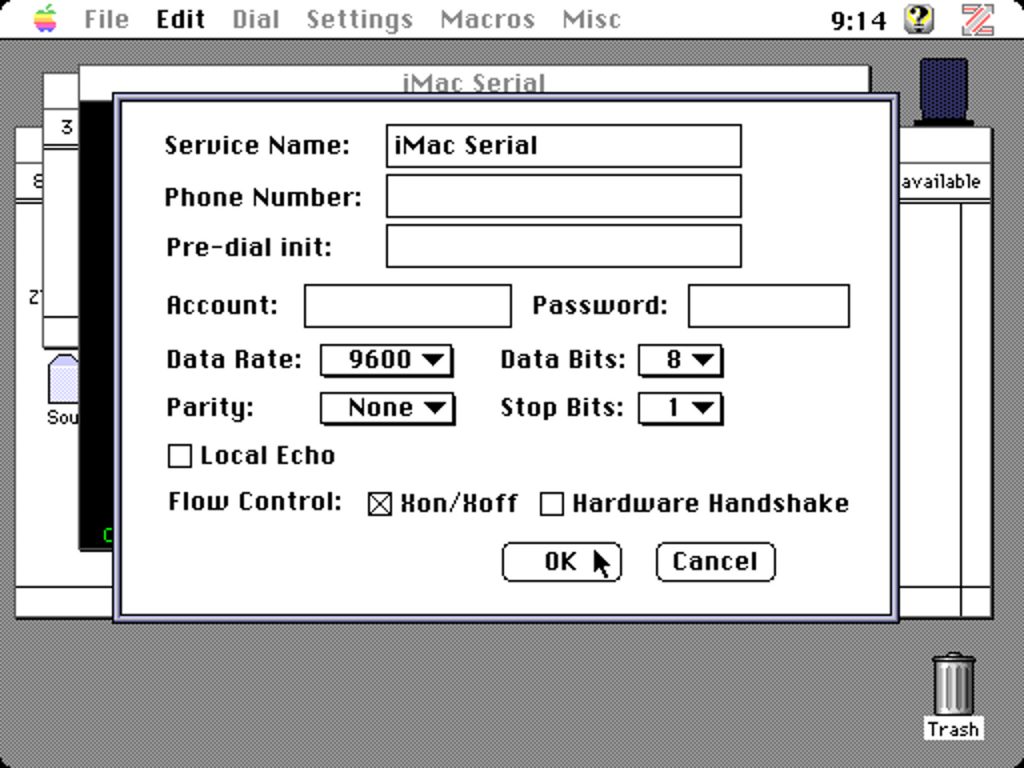
$ sudo launchctl start serialconsolelcOn the LC start ZTerm. In Settings -> Connection define a new connection with the following settings:
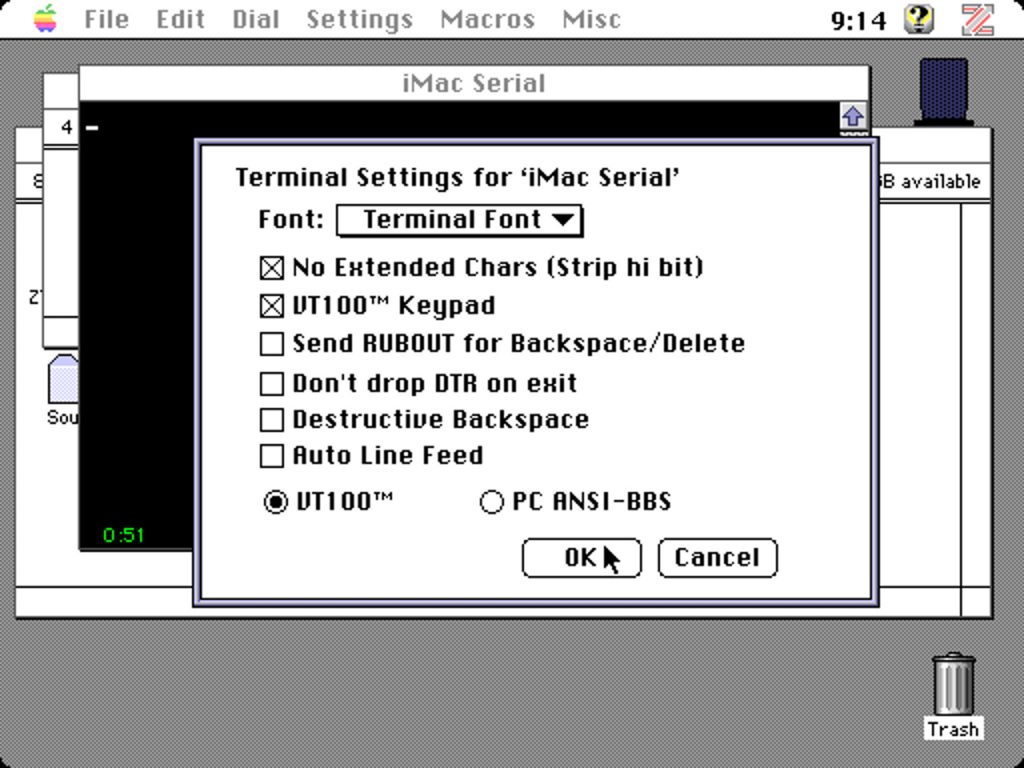
Next, in Settings -> Terminal set the terminal emulation to vt100
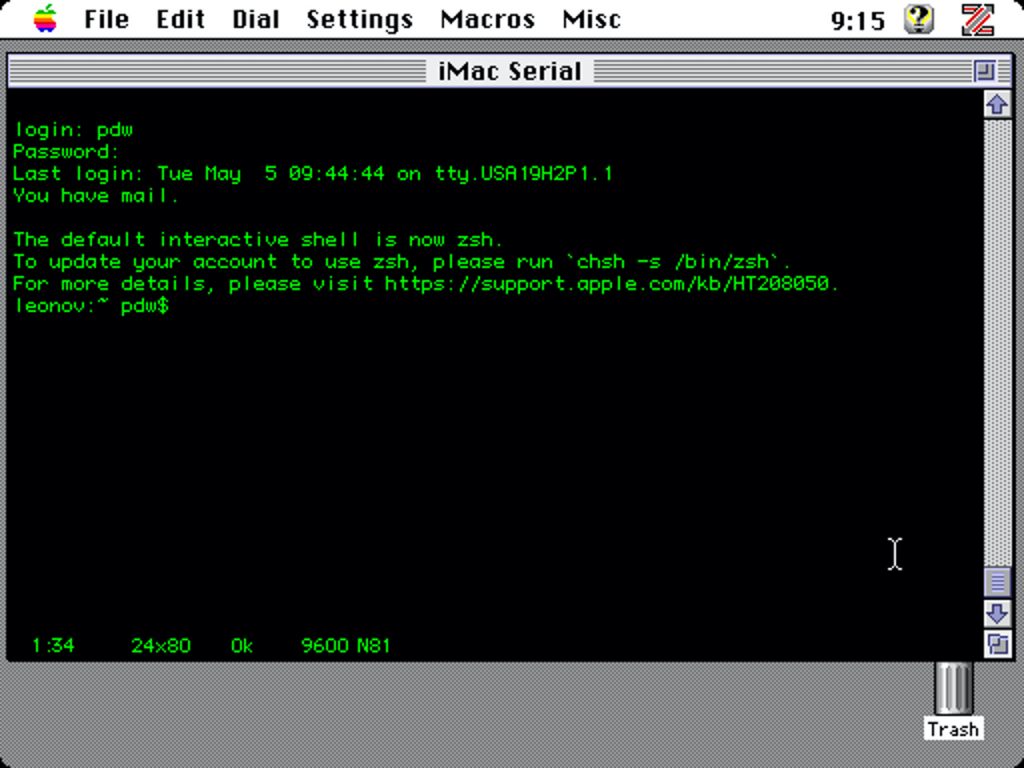
Finally, under the Dial menu option, select the new connection. If everything is setup properly, i.e. cabling, communication and terminal settings between the two machines, a login prompt will appear and a new terminal session will begin.
What motivated me, back in 2007, to initially setup a serial connection between my Apple //c and Mac Mini was ADTPro, a setup that enables the transferring of files between Apple ][ era physical floppy disks and disk images. In other words, it was a method that allowed me to locate and transfer Apple ][ software from the Internet and other connected domains to my isolated //c.
Similarly, with the USB-to-serial cabling in place, I can transfer files between my modern-day iMac and the LC.
First, disable getty, if enabled to listen for terminal connections:
$ sudo launchctl stop serialconsolelc
$ sudo launchctl unload -F /Library/LaunchDaemons/serialconsolelc.plist
Next, launch Serial and ZTerm on their respective systems. First make sure the file transfer will be binary data, select File -> Transfer Covert -> Binary Data in ZTerm.
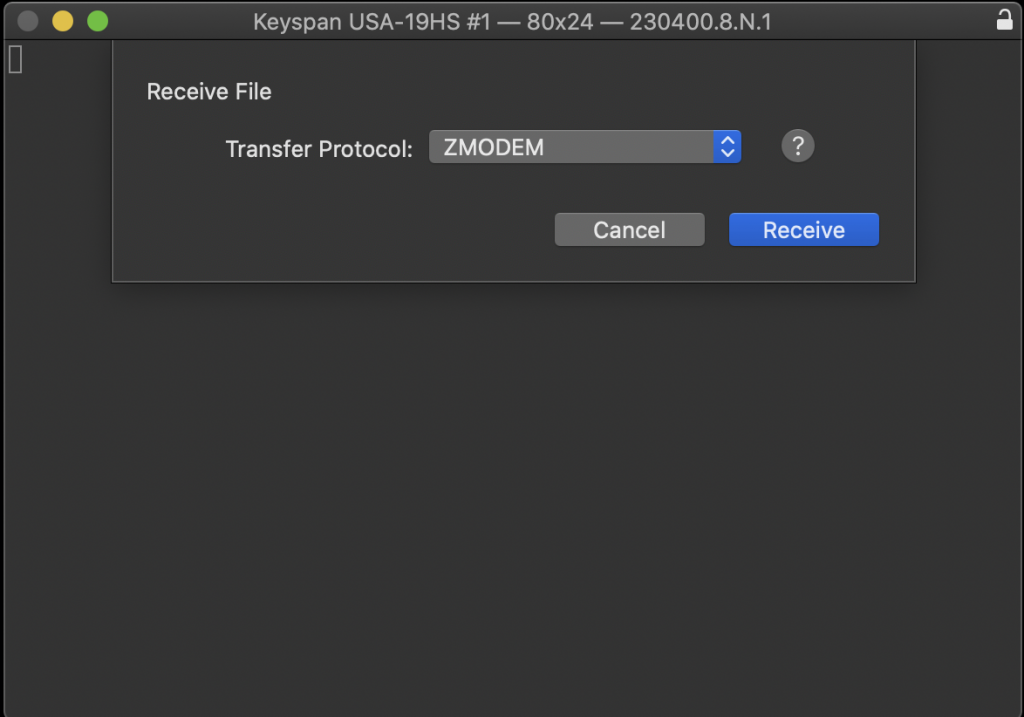
Now, the next steps depend on which direction the transfer is to occur. To transfer a file to a modern Mac, in Serial, after selecting the Port to open select File -> Receive File, choose “ZModem” from the drop down and click on the “Receive” button. Serial is now waiting for the file transfer to begin.
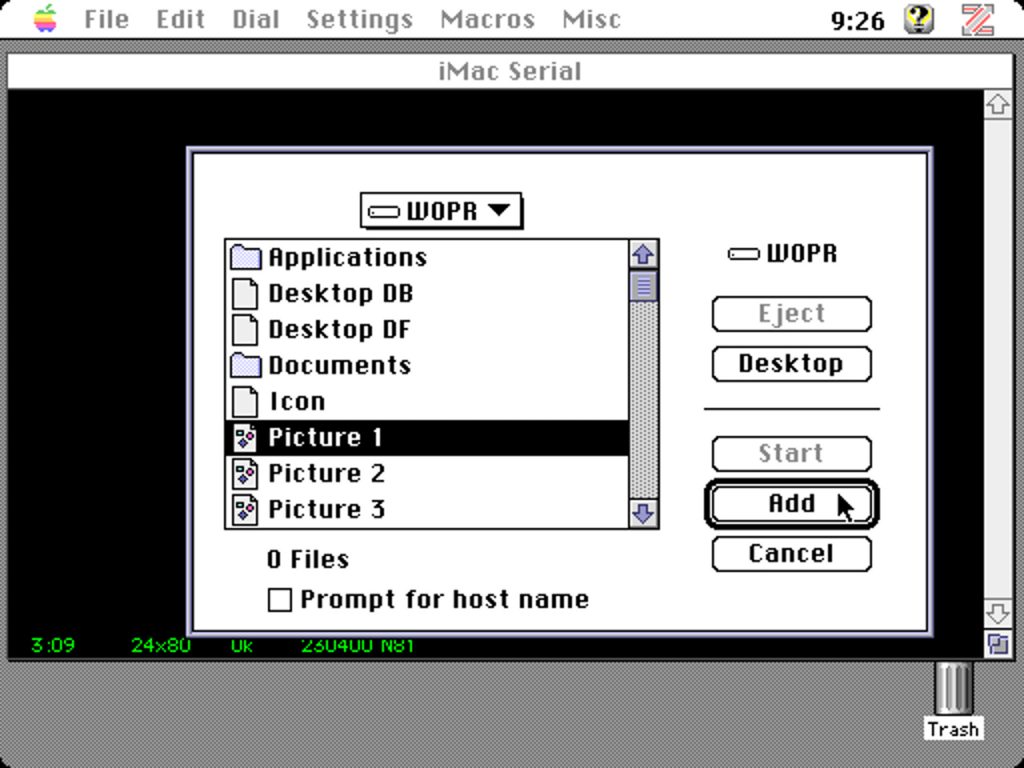
To initiate the transfer, in ZTerm, File -> Send Files -> ZModem, select the file and click on “Add”. Then click on “Start”.
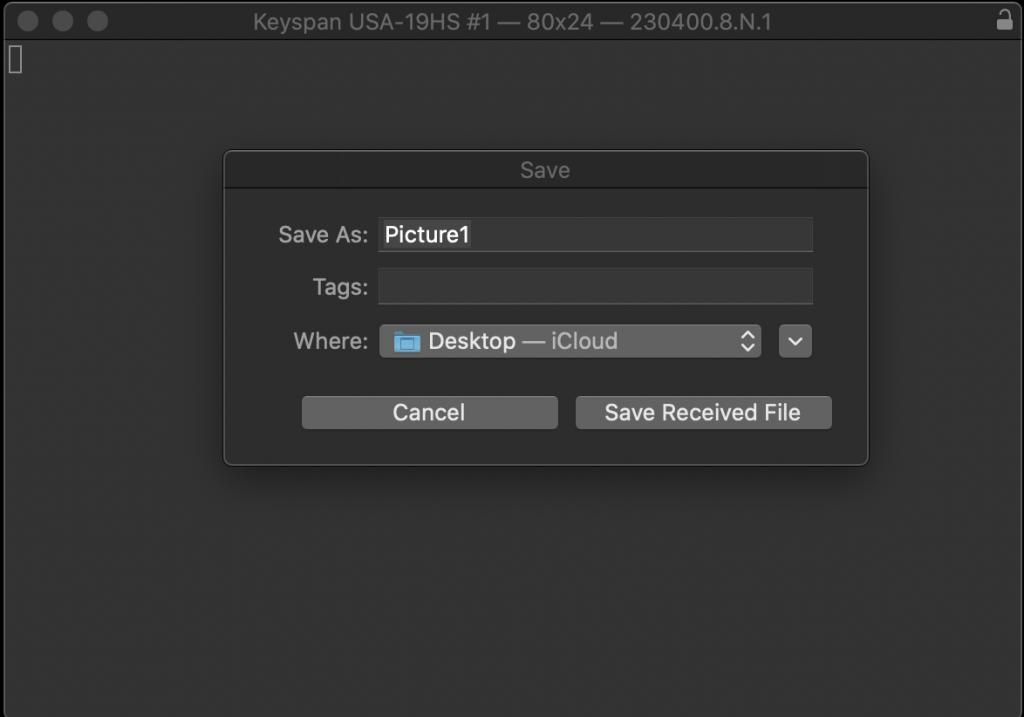
Once the file transfer is complete, Serial will prompt to save the received file.
To transfer from the modern day Mac to a classic Mac, in Serial, after selecting the proper USB device to connect to, select File -> Send File and select the file to transfer. Then, select the ‘Transfer Protocol’ ZModem from the drop down and click on ‘Send’.
In ZTerm go to File -> Receive Files -> ZModem
With that the file transfer will commence.
Of baud rates, protocols and resources forks.
For the terminal connection, the most subjective option is the connection speed. In the example I provided I selected 9600 baud as I find it to be a pleasant, old-school feel of latency, watching the screen redraw, without being too painful slow. I’ve also gotten the connection to work as fast as 230400 bps. Your mileage may vary.
For the file transfer protocol I choose ZModem and not XModem or Kermit for a specific reason. Out of the box, that is, with default settings, ZModem should provide the fastest transfer rate of the three. (Keep in mind we’re still talking about 1980s-era transfer speeds.) Kermit is more robust in a dynamic environment, but thankful we’re not dealing with sound modulation and long distances. XModem was the most widely-adopted of the three, but can’t match the speed and robustness of ZModem. Since, ZTerm and Serial both support ZModem, that’s the protocol I’ve opted for.
Finally, a note about resource forks, p-list files and transfer types. In the classic, pre-OS X days, System OS used a resource fork to store metadata along side a data fork. Among other information stored in the resource fork was the file type. In this way the operating system knew what action to take when a user double-clicked on the file.
Thus, the question in the pre-OS X days was, how to preserve the resource fork when transferring files? This is where the transfer convert option in ZTerm comes into play. Options here include, text, binary and Macbinary. MacBinary was one solution for preserving the two file forks in one, resulting in a file that was suitable for transmission.
However, not all operating systems adopted the resource fork convention. Recall, for example, that Windows has always used a file extension to define a file type. As with Windows, our modern OS X system don’t use resource forks either. For macOS this is the job of p-lists (property list).
What does this mean for transferring from a classic Mac to a modern system? A couple of things. One, in terms of settings to use in ZTerm, set the transfer convert to binary and not Macbinary.
Two, for transferring non-executable files to a modern system, add the missing file extension in order to match the file to an application.. (For example, for the screenshots in this blog, I transferred the files and then added .pict to the filename so I could open them in a modern graphics editor).
For transferring non-executable files to a classic system, the resource file will be missing. This means the first time trying to open the file, drag it over its corresponding application (or open it from within the application itself) and save it to create the proper resource fork.
Three, when using a non-classic Mac as an intermediary, such as transferring a 68k application from an online repository, make sure the application has been archived as a .sit or .sea as these data compression types were designed to preserve resource forks.
These three steps will help quickly navigate managing resource fork issues. Alternatively you can dive into using an application like ResEdit or learn all the different CPU architecture/operating system combinations of StuffIt.